March 18, 2019
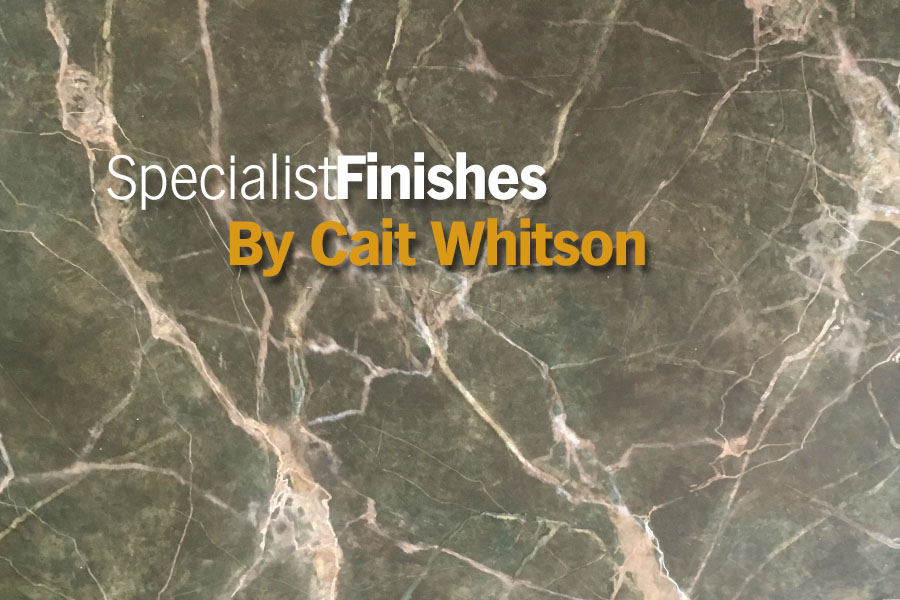
How to: SpecialistFinishes – Verde Marble
Cait is decorative painter working throughout UK and teaching from her studio in Perth, Scotland. You can see her work and connect with her on social media; Twitter and Instagram or Facebook.
There are many forms of Verde (Green) marble and most commonly in decorative painting we think of the term Vert de Mer or Sea Green marble but if you search for this on Google you will find nearly all painted versions. The style demonstrated is inspired by Verde Alpi.
While there are a myriad of Verde marbles there are also a myriad of methods to achieve it, many of them start with a black basecoat, this one starts with white. The method I describe here owes more than a nod to a delightful and very talented marbler Roy Makin some of whose techniques I have employed.
Written instructions below video tutorial:
Basecoat – Benjamin Moore white OC-65 Chantilly Lace in Regal Select Pearl Finish. I use this because I get coverage in 2 coats, and the Regal Select is a hard finish that takes glaze exceptionally well.
Materials used – Matt Medium thinned 1:1 with water, Fusion Acrylic Glaze and artists acrylic colours Raw Umber, Phthalo Green, Black and White
 Tools – a sea sponge, a piece of chamois leather, some wipe out tools or a piece of eraser, rag, a pointed liner and a badger softener.
Thinned Matt Medium dries fast meaning many layers can be applied quickly, making it a great production product. This mix is used for the first 3 stages and the last. Remember these are quick loose layers, don’t fuss.
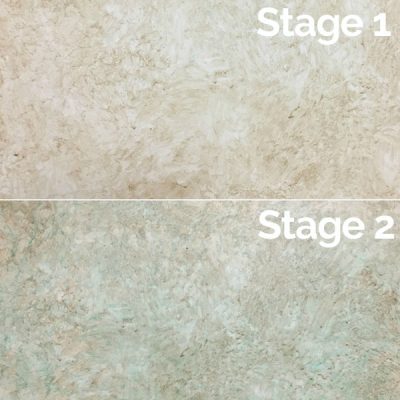
Stages 1&2 -The first layer is just Raw Umber in the Matt Medium mix, paint on and then sponge stipple to give a nice marled finish. You want an all over texture but don’t worry if you get quite a mixed tone or lap lines, soften a little if it starts to run. Within about 15/20 minutes this should be dry enough to apply stage 2. Repeat this process this time using Phthalo Green.
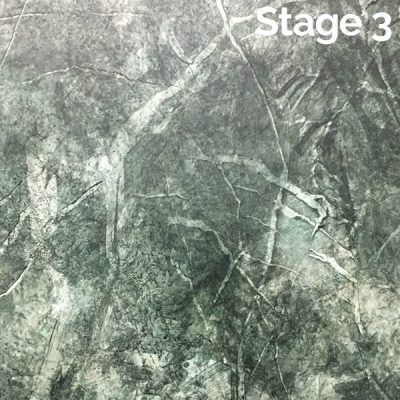 Stage 3 – Next is a much more intense colour that will create the depth and the structure. Use Matt Medium mix and add 2 parts Black to 1 part Phthalo Green. Lay it on and stipple it using the sponge and quickly break up and wipe away areas using the chamois leather. This will give you the main structure on which to create your veining – you should have some areas that start to look like chunks of stone. You can also use rubber wipeout tools or eraser to create finer lines but be quick!!
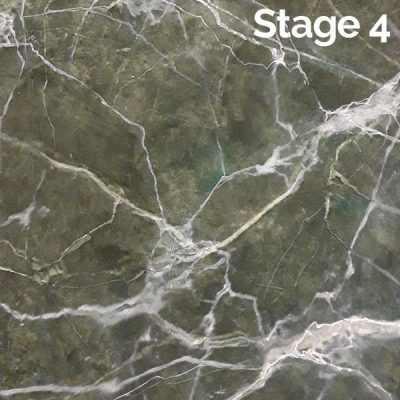 Stage 4 – This is carried out using glaze – I love Fusion Acrylic Glaze but you could use Polyvine or even just continue with Matt Medium if you are quick. Glaze will give you an extended open time. Create a paler version of the stage 3 colour, 2 parts Black to 1 part Phthalo Green. Use the wipeout tool or eraser to reveal pale veins beneath – these imitate sunken veins deep in the marble. Then take a pointed artists brush and white artists acrylic and start to apply your veining structure. Softening these at this stage will give soft blurred veining areas that you can then break up using the wipeout tool revealing the texture below. Carry on creating this range of veins but as the glaze becomes tacky and unworkable in the first area, go back in with a fine lining brush and with White confidently apply fine networks of veins over the top of the original ones – these will be most prominent at the very end.
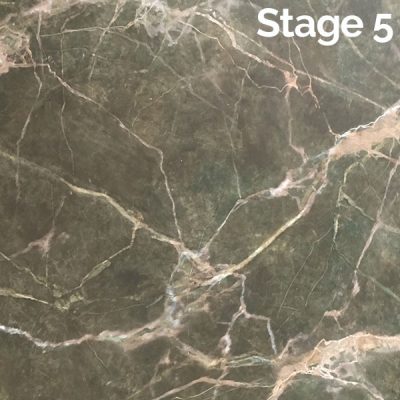 Stage 5 – Once dry go back to the Matt Medium mix with Raw umber. Work this over the top of everything you’ve done and break it up over the veins with a sponge. You can if you want to add a few white schisms at this point. Finish the piece with a semi gloss varnish.
Reproduced from The Professional Painter and Decorator Spring 2019 issue